

Written by Bertrand Théaud, Statrys Founder
20+ years in Asia as a corporate lawyer, investor, and fintech founder. I've sat on both sides of the table and seen the same avoidable mistakes hit founders again and again. The reviews and articles I write are for founders who'd rather skip the mistakes.
Last reviewed April 2026.
Steps to Build an Ecommerce Website
1.
Choose a website builder
2.
Get an ecommerce hosting solution
3.
Purchase a domain name
4.
Pick and customize a website theme
5.
Define your ecommerce website structure
6.
Add your products
7.
Set up payment solutions
8.
Establish a shipping and return policy
9.
Comply With Data Privacy Laws
10.
Ensure website functionality
11.
Track your KPIs
Building an ecommerce website is no longer optional – it’s now a necessity for every entrepreneur who’d want to maximize their business potential.
In the U.S., for instance, 74% of consumers now prefer online shopping over buying from a brick-and-mortar store. And in a separate survey that tracked the shopping channels jointly, it was established that 64% of all buyers’ journeys begin from the web. That is a confirmation that a strong online presence will drive even your in-store sales.
Through this guide, you should be able to get yours up and running without using any coding skills, technical assistance, or costly infrastructure.
Here’s how to build an ecommerce website in 10 basic steps:
Step 1: Choose a Website Builder
For starters, you’ll need an ecommerce platform which will form the foundation of your ecommerce website.
The platforms themselves come in the form of end-to-end software-as-a-service solutions, complete with pre-configured provisions for powering the front-end and back-end functions of your online store.
Factors to Consider When Choosing a Website Builder
On the market, you’ll find a wide range of options, each with its own unique architecture, pricing, and capabilities. To select the best one for your ecommerce store, we’d advise you to prioritize the following:
- Easy Website Builder: Look for an ecommerce platform that allows you to build a full-fledged online store without touching a line of code. You need an intuitive, easy-to-use site builder that designs visually on a responsive WYSIWYG editor.
- Site Themes and User Experience: Now that 73% of consumers consider user experience when making purchase decisions, a well-designed front-end will help you maximize conversions. Your platform should be accompanied by a series of elegant, customizable website templates that have been optimized for both desktop and mobile devices. Keep in mind that mobile alone accounts for 56% of ecommerce sales.
- Performance and scalability: For the highest possible conversion rates, pages in your ecommerce website should load in 2 seconds or less. This is only possible with an ecommerce platform that offers advanced performance features such as resource auto-scaling, caching, CDN, render blocking, image optimization, GZip compression, plus CSS and JS minification. Each additional second in load time would otherwise reduce your conversion rates by 4.42%.
- Product management system: To sell online, you need a powerful inventory management system that supports bulk product uploads, product images, dynamic product filters, multiple shipping solutions, product comparisons, wish lists, etc.
- Content management system: You’d want a built-in content management system that allows you to easily create, publish, and edit multimedia content. Then, since organic traffic drives 38% of all ecommerce sales, the CMS system ought to have an SEO-friendly architecture.
- Integrations: You should be able to expand your ecommerce functionalities through app integrations. The best online store platforms offer a wide range of extensions for email marketing, payment gateways, CRM, conversion optimisation, analytics, shipping, order fulfilment, ERP, etc.
Ecommerce Website Builders You Should Consider
Those feature considerations above will lead you to ecommerce platforms such as:
- Shopify: With this site, you can create and manage online stores with features like inventory management, order processing, payment processing, shipping, marketing, and analytics.
- Wix: A website builder that also supports ecommerce needs. You can create and customise your ecommerce website using drag-and-drop tools and templates. It includes features like online payments, social media integration, and more.
- Squarespace: Another website builder with ecommerce capabilities, offering features such as online payments, inventory management, marketing, and analytics.
- BigCartel: An ecommerce platform designed for artists and creatives. It offers simple tools and templates for creating and selling products online. It includes features like inventory management, payment processing, shipping, and analytics.
Step 2: Get An Ecommerce Hosting Solution
The ecommerce platforms that we mentioned above are full-stack ecommerce platforms. That means they take care of web hosting, in addition to powering online stores.
This is a privilege you won’t get from on-premise solutions such as WooCommerce and Magento. Both are open-source software that can only be deployed on third-party infrastructure.
The infrastructure, in this case, is web servers from ecommerce hosting solutions. And, in particular, you might want to try out renowned hosting providers such as Bluehost, GoDaddy, SiteGround, A2 Hosting, or DreamHost.
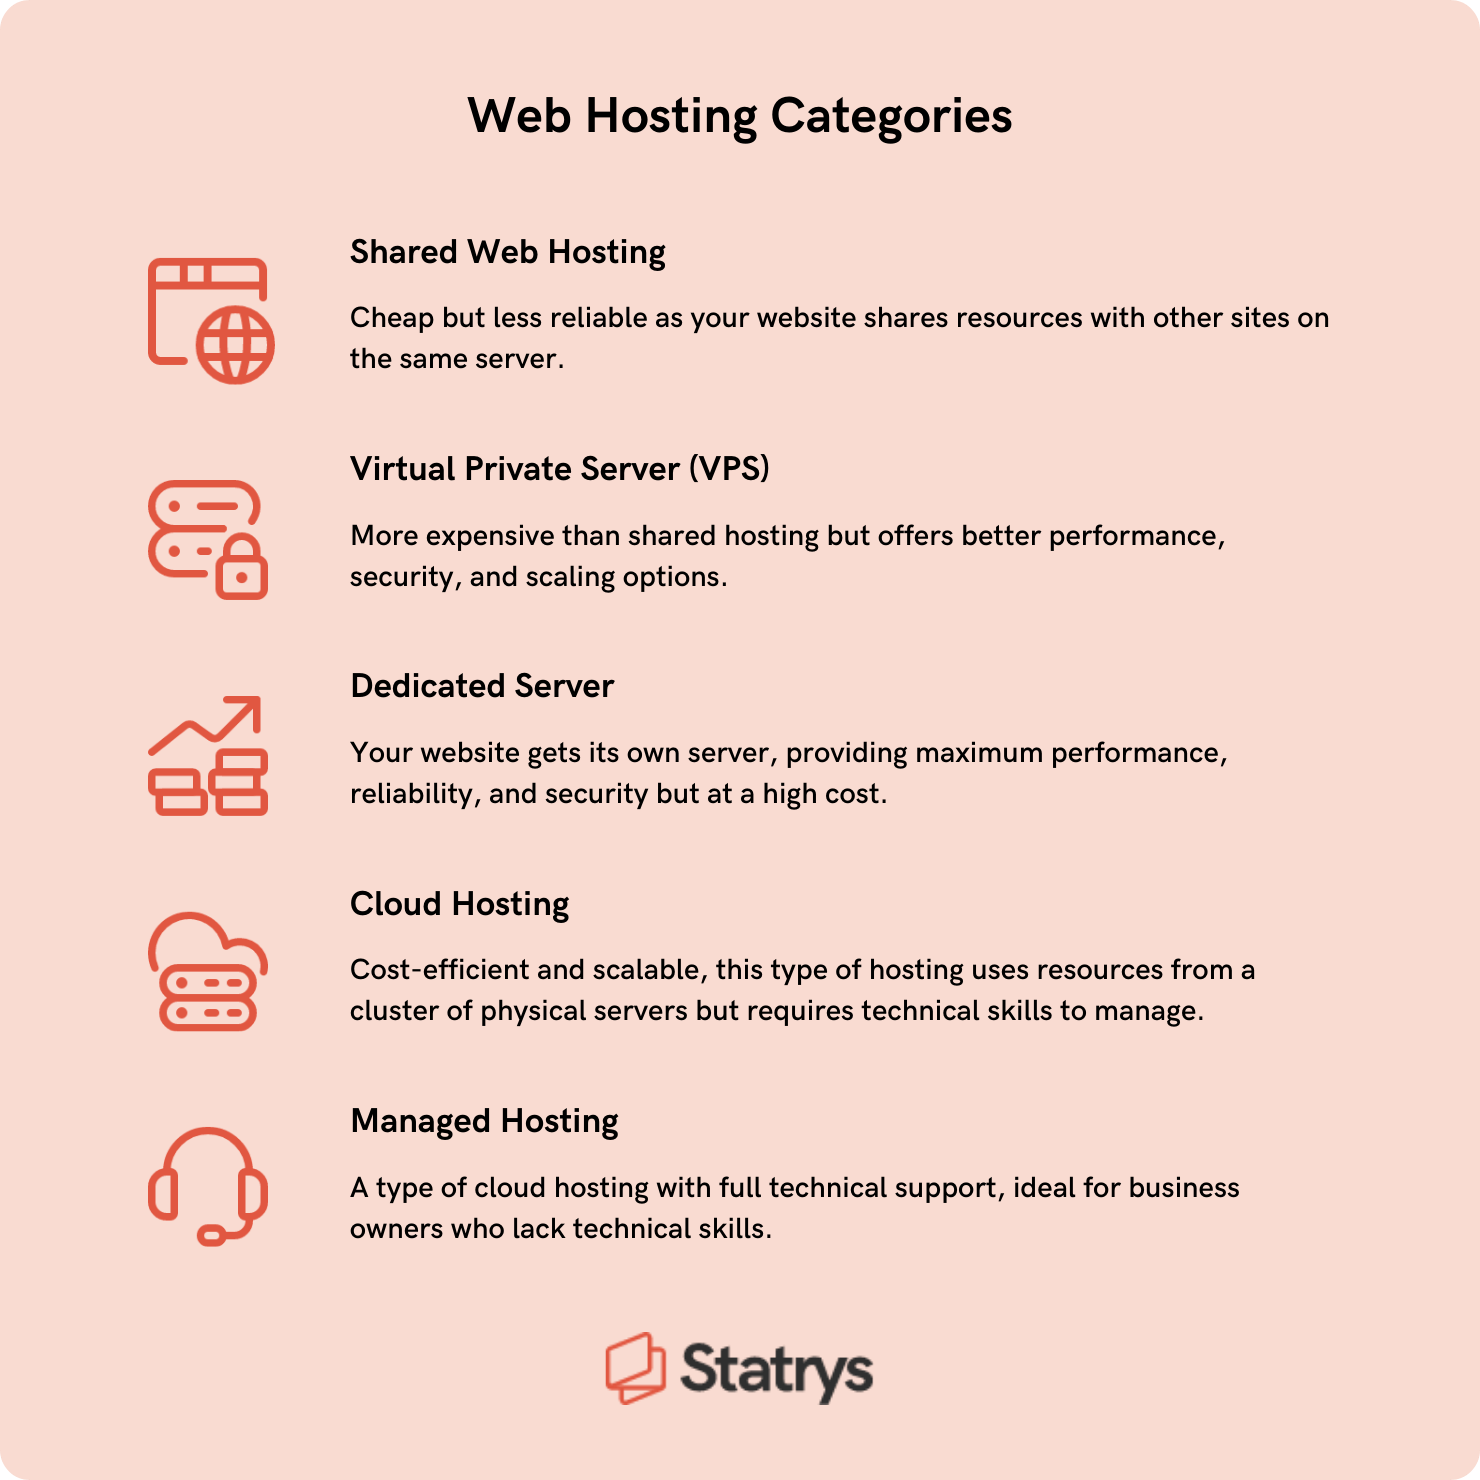
All five of them offer server allocations in the following web hosting categories:
- Shared web hosting: This is the cheapest option, but the worst in terms of performance and reliability. Your ecommerce website is placed on the same server space with several other sites, which means that they all end up sharing system resources – like CPU, bandwidth, and RAM.
- Virtual private server (VPS): If you choose to purchase VPS hosting, your ecommerce website will be held on a shared machine but in its own separate partition – complete with isolated resources. The result is increased performance, better traffic handling, fewer security risks, dynamic scaling, and faster loading speeds. But, it’s not cheap.
- Dedicated server: Dedicated hosting means your ecommerce site gets an entire machine to itself. You get to enjoy peak performance, ultimate reliability, robust security tools, extended bandwidth, and custom scaling without any interruptions. The pricing, however, is only economical for large enterprise sites with super high resource demands.
- Cloud hosting: Whereas VPS hosting offers isolated resources from a single shared machine, cloud hosting sets up a virtualized environment that relies on resources pulled from a cluster of physical servers. This multi-server architecture is a cost-efficient way of achieving optimal scalability, high availability, and supercharged performance. The only problem is, you’ll need technical skills to manage the whole deployment.
- Managed hosting: This is a form of cloud hosting service that comes with full technical support. Once you get your ecommerce website up and running, the web host will proceed to take care of the server configurations, platform updates, system security, etc. That favourable combination makes managed hosting the best ecommerce hosting option for business owners who lack technical skills.
When developing an eCommerce website, align your site with business goals and customer requirements. Select a platform suitable for your business size: for beginners, Shopify is a budget-friendly option, while established businesses should opt for more custom solutions like Web Flow, WordPress or Joomla, to develop a more professional, user-friendly design, that can boost user experience and conversion rates.
Prioritize hosting quality, as faster websites tend to have higher conversion rates. Kinsta is recommended for their state-of-the-art security and speed.

Step 3: Purchase a Domain Name
A domain name is the web address that visitors will use to identify and access your ecommerce store. This is what will point their browsers toward your site.
Choose a Registrar
To reserve a domain name, you should find a domain registrar that is duly accredited by the Internet Corporation for Assigned Names and Numbers (ICANN). Examples include Domain.com, Namecheap, Hover, and Google Domains.
You could, otherwise, register the domain name with your web host. Ecommerce hosting solutions like GoDaddy, Bluehost, and Dreamhost happen to double up as domain registrars. The same provision is available on all-inclusive ecommerce platforms such as Shopify, Wix, and BigCommerce.
Other features to look out for from the best domain registrars include a free SSL certificate, along with free WHOIS privacy protection.
Expert Insight
When selecting a domain registrar, it's essential to prioritize security against domain hijacking and consider additional services like email and web hosting. Assess the registrar's renewal policy/prices and the convenience of consolidating infrastructure with one provider. Don't forget to check the transfer policy for domain registration because it determines the flexibility and ease of transferring your domain registration to another registrar in the future if needed.

Brainstorm Domain Name Ideas
Whichever registrar you ultimately choose, ensure that you’ve exhaustively brainstormed domain name ideas before proceeding. You need a short, creative, and memorable domain name that reflects your business.
But, don’t go for a generic one – instead, try to find a brandable name without infringing any copyrights or trademarks.
For relevant suggestions, you could try running your brainstormed ideas through free domain name generators like DomainWheel. You just need to enter a keyword or phrase, and its AI engine will provide contextual suggestions of the available domain names across different TLDs.
Top Level Domains (TLDs) are the suffix extensions that come right after the domain name. They reveal more details about the purpose, owner, and geographical focus area of the ecommerce website.
Some of the TLDs that you could have on your online store’s URL are:
- .com: Stands for “commercial”.
- .net: Stands for “network”.
- .store
- .online
- .co: Stands for “company”.
- .us: Ideal for US-based ecommerce businesses.
- .biz: Stands for “business”.
- .eu: Suitable for Europe-based online stores.
- .shop
Feel free to play around with different domain name-TLD combinations for your ecommerce store. When trying out different TLDs, you may find a unique domain name that will work best with your brand.
💡 Recommendation: When you find the best fitting TLD, you can proceed with either a 1-year or 10-year domain registration.
Step 4: Pick And Customize a Website Theme
This is the stage where you get to build an ecommerce website front-end. And to save you the trouble of creating everything from scratch, the best ecommerce platforms provide a host of customizable website themes and templates.
A website theme is a pre-built site that serves as a design blueprint for new websites. Instead of starting with a blank canvas, you get to work your way up from a ready-made website prototype.
You just need to pick one that fits your business plan, tweak some minor appearance settings to match your brand, add content, and then publish the entire composition as your ecommerce website.
The process is particularly seamless on ecommerce platforms like Shopify, Wix, and Squarespace. They all come with an array of professional website themes that you can edit visually on their accompanying drag-and-drop website builders.
To help new businesses, some companies offer deals to get you started. For example, Shopify offers free trials for interested businesses.
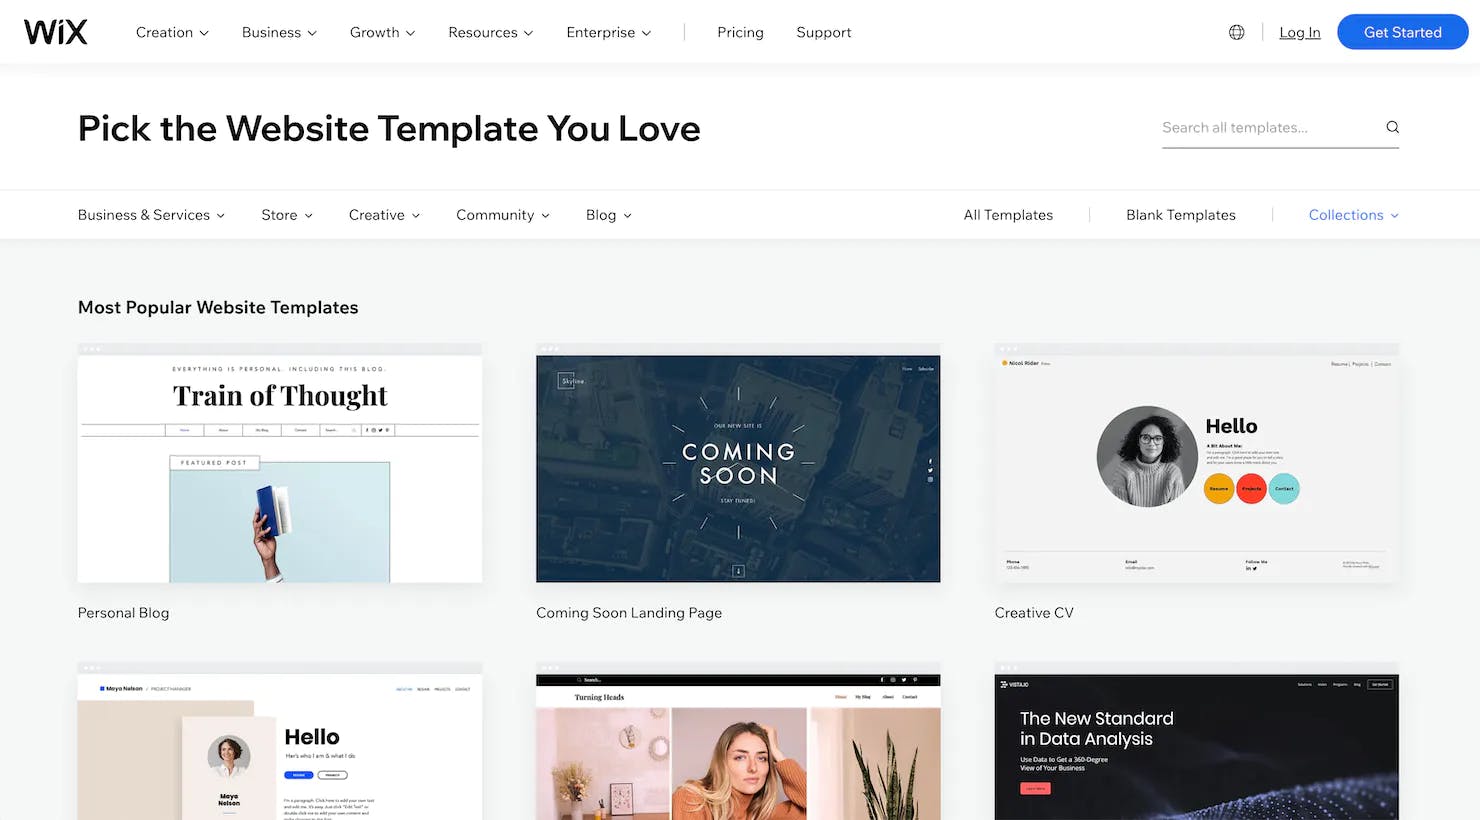
Wix, for instance, boasts a collection of over 800 free templates, 130 of which are reserved for online stores across different ecommerce industries. You’ll find nearly the same volume of ecommerce-oriented options in Squarespace’s template library, all of which are free to use.
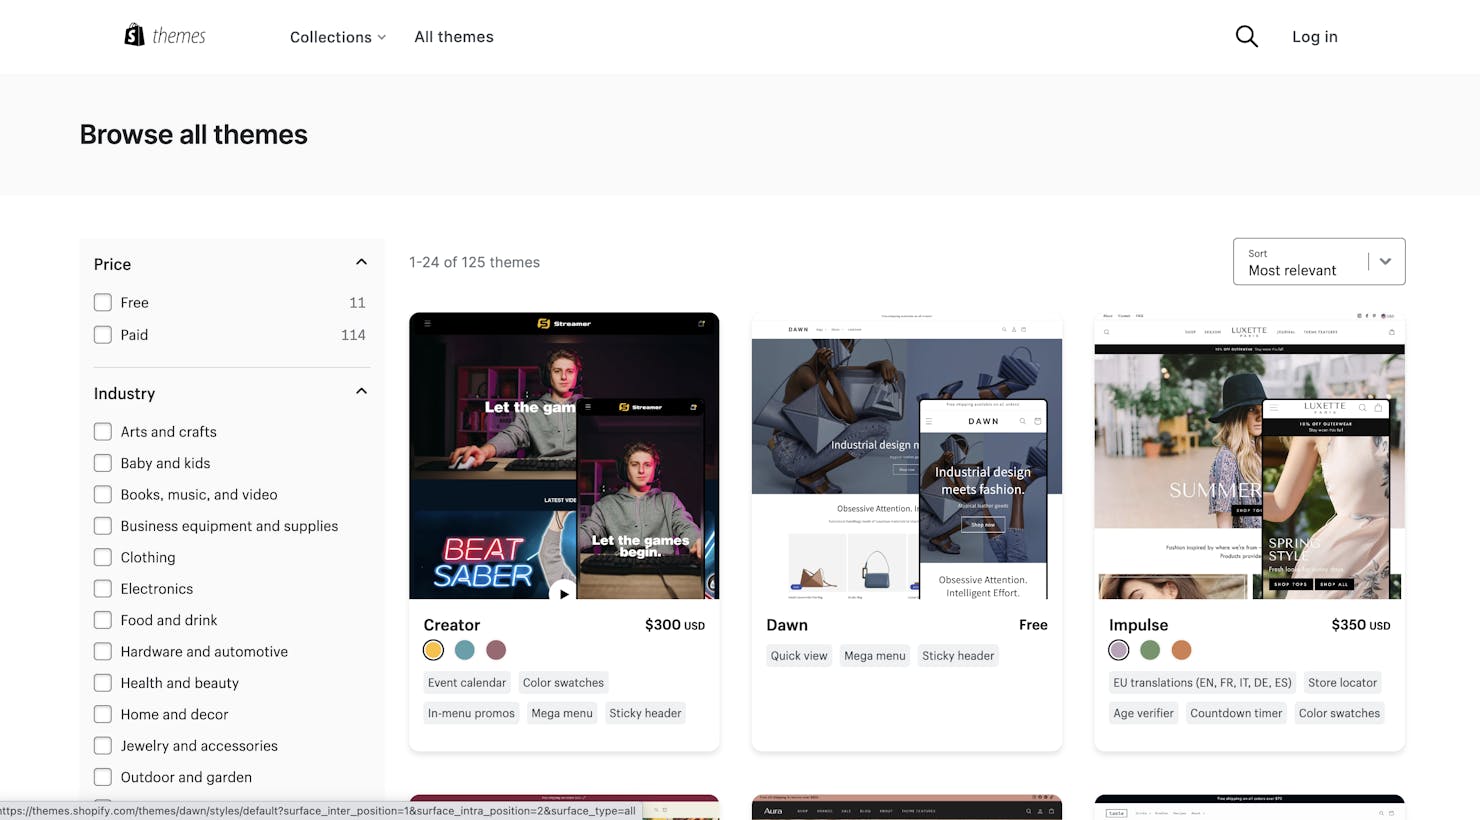
Shopify, on the other hand, features a total of 125 online store themes. Only 11 of them are free, while the rest are premium themes that cost $150 - $350. Nevertheless, the designs here are superior to both Wix’s and Squarespace’s in terms of depth, elegance, and functionality.
If you want unrestricted customization capabilities, the best ecommerce platform would be WooCommerce. The theme options in its library and the WordPress repository add up to thousands, most of which are free. With the right coding skills, you should be able to edit them extensively from the underlying source code.
Website Theme Checklist
Consider the following factors when choosing a theme or a template for your ecommerce website:
- Customization: Make sure that the template can be customized to reflect your brand and business's identity. Consider if it supports customization of fonts, colours, product display, and embedded social media content.
- Easy navigation: Smooth navigation is vital for a great customer experience. Opt for a clear, left-aligned navigation bar that allows customers to find what they need easily.
- Responsiveness: Ensure the template adapts to different screen sizes for optimal viewing on various devices.
- SEO-friendliness: Look for a template that supports SEO optimization. This means it should come with features such as meta tags and URL structure.
- Support and updates: Choose a reputable theme that provides regular updates and support to keep your website secure and bug-free.
Step 5: Define Your Ecommerce Website Structure
49% of shoppers today are using Google to discover or find new products. And to reach those customers, one of the things you’ll need in your ecommerce store is a well-organized URL structure. This is how you make it easy for Google’s bots to crawl through your ecommerce website, read your web pages, and understand the business model plus its products.
You could, for example, arrange your URLs in a hierarchical structure. Your landing pages could link directly to product categories, which would then lead to their respective sub-categories, and so forth.
Case in point – imagine running an online store that deals in men’s and women’s clothing. If you applied the hierarchical URL structure, the homepage would channel visitors to either of these two category pages:
- www.onlinestore.com/category/men
- www.onlinestore/category/women
Then in the men’s section, you could have subcategories like:
- www.onlinestore.com/category/men/formal
- www.onlinestore.com/category/men/casual
The subcategory level would ultimately usher shoppers into the corresponding product options, followed by the product pages.
Google additionally advises business owners to pay attention to the characters in their URL paths. Every page in your online store should have a short web address that contains descriptive keywords in the URL path.
For example, instead of this…
- /product/336
You should describe the product itself with relevant keywords like…
- /product/brown-leather-moccasin-shoes-for-men
At least then, Google’s crawlers will index your product page within the appropriate SERPs.
And if you happen to have multiple variants of the same product, Google would appreciate it if you picked just one of the variants to be showcased in the search results. It won’t support any more than that.
To proceed, just set your selected primary variant as the canonical URL. Google will then fetch that snippet plus the accompanying product details for placement in the SERPs.
Expert Insight
The most important thing to keep in mind is to maintain consistency in your URL structures across the website. Use a standard format that is easy to read and follow, such as using lowercase letters, and hyphens to separate words, and avoid special characters or space. It is important because a well-structured URL can help users understand the site's navigation and hierarchy.
Lastly, try and incorporate relevant keywords into your URLs, preferably in a logical and natural manner. This can provide additional context to search engines and improve the page's visibility for relevant search queries.

Step 6: Add Your Products
Your product pages affect customers' purchasing decisions, so it's best to optimize them by considering the followings:
Make product pages SEO-friendly
As you start adding individual products, be mindful of SEO and the marketing strategies that’ll follow when you start selling online.
The best place to start is with thorough SEO research and finding the best keywords for capturing your target market.
We also recommend leveraging the likes of SEMrush, Ahrefs, Moz, or SpyFu to help with keyword research, competitor research, market analysis, and content optimization. These tools will allow you to build a good foundation for your website and help you avoid potential SEO issues later on which can be costly to fix.
Then if you hope to have your products featured by Google as rich snippets, you might want to insert product schema markup into the pages, such as Product schema, FAQs and BreadcrumbList.
You don’t need any coding skills for that. Just install a relevant product schema extension into, say, your WordPress website and then use visual tools to define your structured data. Remember to embed even the product reviews, shipping details, ratings, pricing, etc.
Expert Insight
With a growing number of users accessing websites through mobile devices, it's wise to ensure that your product pages are easily accessible and user-friendly on mobile devices.
Neglecting mobile optimization not only disregards a significant portion of your potential user base but also sends a signal to search engines like Google that you are not catering to the needs of mobile users. This can result in a poor user experience and have a significant impact on your SEO performance.
Aim for the high-quality product image
Another element you shouldn’t take for granted is the product image. This is the first thing that 75% of online shoppers reportedly look at when trying to make purchasing decisions.
Here are what audiences want to see
- Multiple high-quality images: Showcase the high-quality product images from multiple angles. Consider hiring professional photographers and models for the job.
- Usage: Include an in-context photo demonstrating product usage. For example, if you sell lamps, show how they look in a bedroom with the lights off.
- Size-consistent images: Varying sizes can cause misalignment in your gallery. It's better to use the same size for each image to maintain consistency and adjust the pictures with an image editor to match the required dimensions.
- Description: Provide a brief but informative description of the product features, benefits, and specifications. This can help customers understand what they are buying and how it can solve their problems or meet their needs.
Step 7: Set Up Payment Solutions
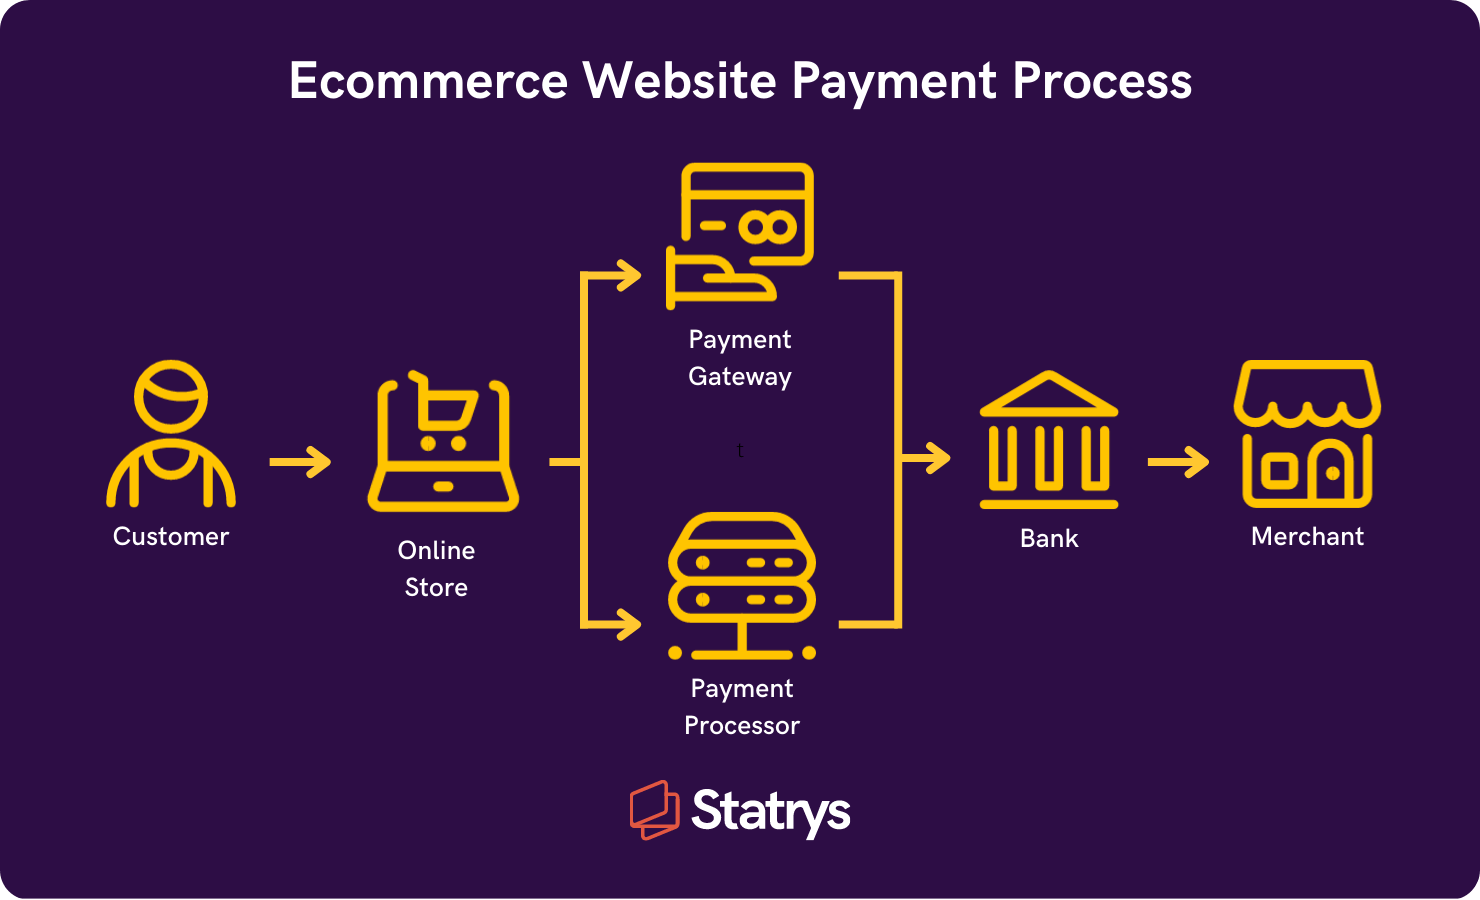
Your online business is not officially an ecommerce store until it can accept credit card payments and process digital transactions. For that to happen, you’ll need two payment solutions:
- Payment gateway
- Payment processor
You can think of a payment gateway as a virtual point-of-sale card reader. Its job is to accept credit cards from customers, verify the card details, and then submit the information to your payment processor.
The payment processor, on the other hand, is a merchant service that processes transactions. Once it picks up the card details from your payment gateway, they’re relayed to the customer’s bank for authorization. Then if everything checks out, the funds are remitted through the payment network to your account.
The two services don’t have to be separate, though. Some payment processors happen to double up as payment gateways. That means that they not only accept and validate cards but also act as an intermediary between customers’ banks and merchant accounts.
💡 Tip: Examples include Stripe, PayPal, and Square which are featured in our compilation of the best payment gateways for ecommerce websites.
What to look for in payment solutions
To pick out the ideal one for your online store, we’d advise you to consider these factors:
- Compatibility: A quick search through your ecommerce platform’s integrations repository will reveal the payment gateway services that are compatible with your online store. And since 17% of cart abandonments are due to complex checkout processes, you might want to prioritize the payment solutions with one-page checkouts.
- Region of operation: Check and confirm the countries supported by each of your selected payment gateways. You need a service whose merchant accounts are open to businesses registered in your country. Plus, it should be accepting payments from all the areas you’ll be targeting.
- Payment methods: Insufficient payment methods drives 9% of cart abandonments. So, try surveying your target audience for insights into their preferred payment methods, and then pick out the payment gateways that offer the options. Mobile wallets are the most preferred globally, accounting for 49% of ecommerce transactions. Credit cards come in second at 21%, followed by debit cards at 13%, while bank transfer facilitates 7%.
- Security: Make sure you have SSL certificates for your payment solutions that can secure all transactions and customer information. Additionally, your payment gateway should comply with the Payment Card Industry Data Security Standard (PCI DSS) to protect credit card details.
Step 8: Establish a shipping and return policy
Over 50% of global consumers agree that delivery speed affects their purchase decision, and 38% said free or discount shipping influences their decision. Likewise, 86% of global consumers cite product return policy as a decision factor when choosing where to purchase.
That said, having the policy in place is beneficial for the checkout experience.
Shipping solutions are usually included with the ecommerce website builders package. You can set either real-time shipping rates or flat rates based on order totals.
As for your shipping strategy, you can ship from your own place, use a dropshipping company that supplies and ships the products for you, or use a third-party logistics company that stores and ships the products for you. Check out services that can be integrated with your ecommerce store, like Shipstation or Shippo
Step 9: Comply With Data Privacy Laws
Ecommerce websites typically collect information from visitors that may be protected by data privacy laws such as the California Consumer Privacy Act (CCPA) and the General Data Protection Regulation (GDPR).
Personal information is legally defined as any data that can directly or indirectly identify an individual or household.
Your website might collect this type of data if you:
- Collect full names and an email address to send a newsletter.
- Collect full names, physical addresses, and payment information to complete a sale.
- Deploy Internet cookies on users' browsers for analytics or targeted advertising.
- Monitor the online behaviors of your website visitors.
Your website must meet the requirements of any applicable privacy laws so you don’t get fined or penalized for noncompliance.
Most of these laws require you to present users with a privacy policy explaining what data you collect, how you use it, if you share it with any third parties, and what rights your users have over their information.
In addition, many third-party services, such as Google Ads and Analytics, require ecommerce sites to publish a privacy policy as part of their terms of use agreement.
To simplify compliance with privacy laws, consider using a website privacy policy generator that includes the clauses required by the privacy laws that apply to your business so you can quickly create one of these documents for your ecommerce store.
Step 10: Ensure website functionality
Before launching your ecommerce store, it's crucial to ensure its proper functioning and user experience. Consider the following testing aspects:
- Checkout functionality: Test if you can complete purchases smoothly and securely on the website. Process test orders with different payment and shipping options. Verify order confirmation emails and invoices for accuracy.
- Cross-browser compatibility: Ensure your store looks and works well on various browsers like Chrome, Firefox, Safari, Edge, etc. Use tools like BrowserStack to simulate browser compatibility.
- Mobile compatibility: Make your store mobile-friendly and responsive. You can use Google's Mobile-Friendly Test tool to assist with this process.
Step 11: Track Your KPIs
When the ecommerce site finally takes shape, you can begin setting up the foundation for business growth. Ecommerce analytics tools, in particular, are great additions as they’ll be tracking Key Performance Indicators (KPIs) – from which you’ll get valuable insights for informing your business decisions.
Some of the most basic ecommerce metrics to consider are:
- Traffic volume: The number of unique visitors accessing your website in a month.
- Bounce rate: The percentage of website visitors who leave after viewing only one web page. So far, 47% is the average for ecommerce sites. Mobile devices lead with a 51% bounce rate, followed by tablet users with 45%, while desktop traffic bounces at the rate of 43%.
- Conversion rate: The percentage of website visitors who end up making a purchase. On average, online stores are recording a conversion rate of about 2.9%.
- The number of orders: The number of items bought over a specific period. About 28% of online shoppers end up buying more than one item per purchase.
- Net profit: The gross revenue minus the total expenses incurred by your online business. Online retail stores are generating an average net profit margin of 8.89%.
- Cart abandonment rate: The percentage of shopping carts that did not complete checkout. The average for ecommerce sites is a whopping 69.99%.
To track the KPIs, you could start by activating built-in analytics tools in your ecommerce platform.
Shopify users, for instance, should be able to use Shopify Analytics to monitor online store sessions, average order value, conversion rate, return customer rate, etc.
WooCommerce Analytics does the same on WordPress. Once you set it up, you’ll be getting reports on stock levels, taxes, coupons, revenue, orders, etc.
Otherwise, to keep tabs on the traffic gained from paid advertising and search engine optimization efforts, you could add Google Analytics to your website and also register an account on Google Search Console then connect it to your ecommerce website.
Wrapping Up
And that’s all it takes to build an ecommerce website.
You can give the project about 100 hours or so, most of which will be spent on setting up product pages and optimizing their content for SEO. Another thing that might take up a significant chunk of your time is website testing.
As for the costs, you can go ahead and check out our article on the costs of building an ecommerce website. It provides guidelines on how much you should set aside for each stage of the project.
If you want a cheaper alternative, the best would be a storefront on any of the popular online marketplaces. You could, for instance, create an online dropshipping business on Amazon for less than $50 a month.
Otherwise, if you happen to be a high-capital investor, you could save yourself all that trouble by acquiring an established business instead. Here are the best ecommerce business marketplaces for existing WordPress sites, Shopify stores, Amazon storefronts, and so forth.

FAQs
What platform should I use to build an Ecommerce Website?
It depends on the needs of your business, but you can look for a platform that provides an intuitive building experience with features such as inventory management, performance optimization, and app integrations. Some examples are Shopify, Wix, SquareSpace, and BigCartel.
How much does it cost to build an Ecommerce Website?
Building an ecommerce website can cost you from $50 to tens of thousands of dollars, depending on several factors such as the type, structure, size and customization of the online store you plan to build.
How long will it take to build an Ecommerce Website?
It may take approximately 100 hours to build your website with the majority of the time spent on creating product pages and optimizing your content for SEO. You may also spend additional time testing your website.
What is the easiest way to build an Ecommerce Website?
The easiest way to build an ecommerce website is to use a website builder that allows you to build a full-fledged online store without touching a line of code. You need an intuitive, easy-to-use site builder that designs visually on a responsive WYSIWYG editor. Examples of these builders are Shopify, Wix and SquareSpace.
How can I make my own ecommerce website?
Yes, if you don’t wish to hire a developer to develop your website, you can build a website on your own using no-code ecommerce sites builders like Wix, Shopify, and SquareSpace.


