

Written by Axel Firer, Business Expansion Manager
Axel has built a distinguished career in project management, focusing on the finance and insurance sectors. He started his career in 2011 in Japan, where he honed his skills at a prominent French Investment Bank, working with both the Finance and Operation departments, directly under the COO of the ...
Last reviewed by March 2026.
Key Takeaways
To create a professional invoice, the following information must be included: business information, client details, invoice number, invoice date, a clear description of the goods or services provided, the total amount due, any applicable discounts and taxes, payment details, and payment terms.
Alternatively, businesses can use templates, invoice generators, or invoicing software to streamline the invoicing process instead of creating an invoice manually.
As a business owner, it is very important to understand invoicing because it directly affects your business's cash flow. Statistically, 87% of businesses face late invoice payments, usually because mistakes or unclear instructions on the invoices cause clients to pay past the due date.
This article will walk you through a step-by-step guide on what to include and how to make properly structured invoices. Continue reading for practical invoicing tips you can always follow to get your payments on time.

What to Include on an Invoice?
If you are a business owner, there are essential details that you need to include on every invoice when issuing them to collect payments from your customers. These pieces of information are necessary for the buyer to make an accurate payment and for both you and your client to record the sales transaction.
Here is what you must include on an invoice:
- Contact details: Include the contact information, such as the name, address, and phone number of both the seller and the buyer, at the top of the invoice.
- Invoice number: Assign a unique identification number to each invoice to help organize the invoices, as well as track payments and manage transactions.
- Invoice date: Mark the date the invoice is issued and sent to the client.
- Description of goods or services: Provide a clear and concise description of the goods or services, including quantity, unit price, and total amount.
- Total amount due: State the total amount owed for the goods or services provided.
- Applicable discounts and taxes: Include any applicable discounts or taxes. Discounts are usually subtracted before taxes are factored in.
- Payment details: Include payment methods and all necessary details clients need to be able to make a payment.
- Payment terms: Clearly state the payment terms, including the due date and any late payment fees or interest charges.
💡 Fact: There are different types of invoices that may have additional purposes to requesting payments. To avoid confusing your clients, make sure you are using the right one.
How to Make an Invoice: A Step-By-Step Guide
You can generate invoices using a number of different methods. Although some businesses still send paper invoices to collect payments, there are several convenient ways to fill out the invoices:
- Document creation applications: This type of software, such as Microsoft Word and Google Docs, allows companies to create their own invoice template or choose from their customizable invoice templates.
- Online template providers: These are online websites that provide an extensive collection of paid and free invoice templates that users can choose from.
- Dedicated invoice software: This specific type of software is designed to help businesses create, send, and manage invoices in one place.
There are no specific regulations concerning how businesses must format the invoices, but they typically follow a similar structure. Let’s take a look at an example of a standard invoice template and where to put each information.
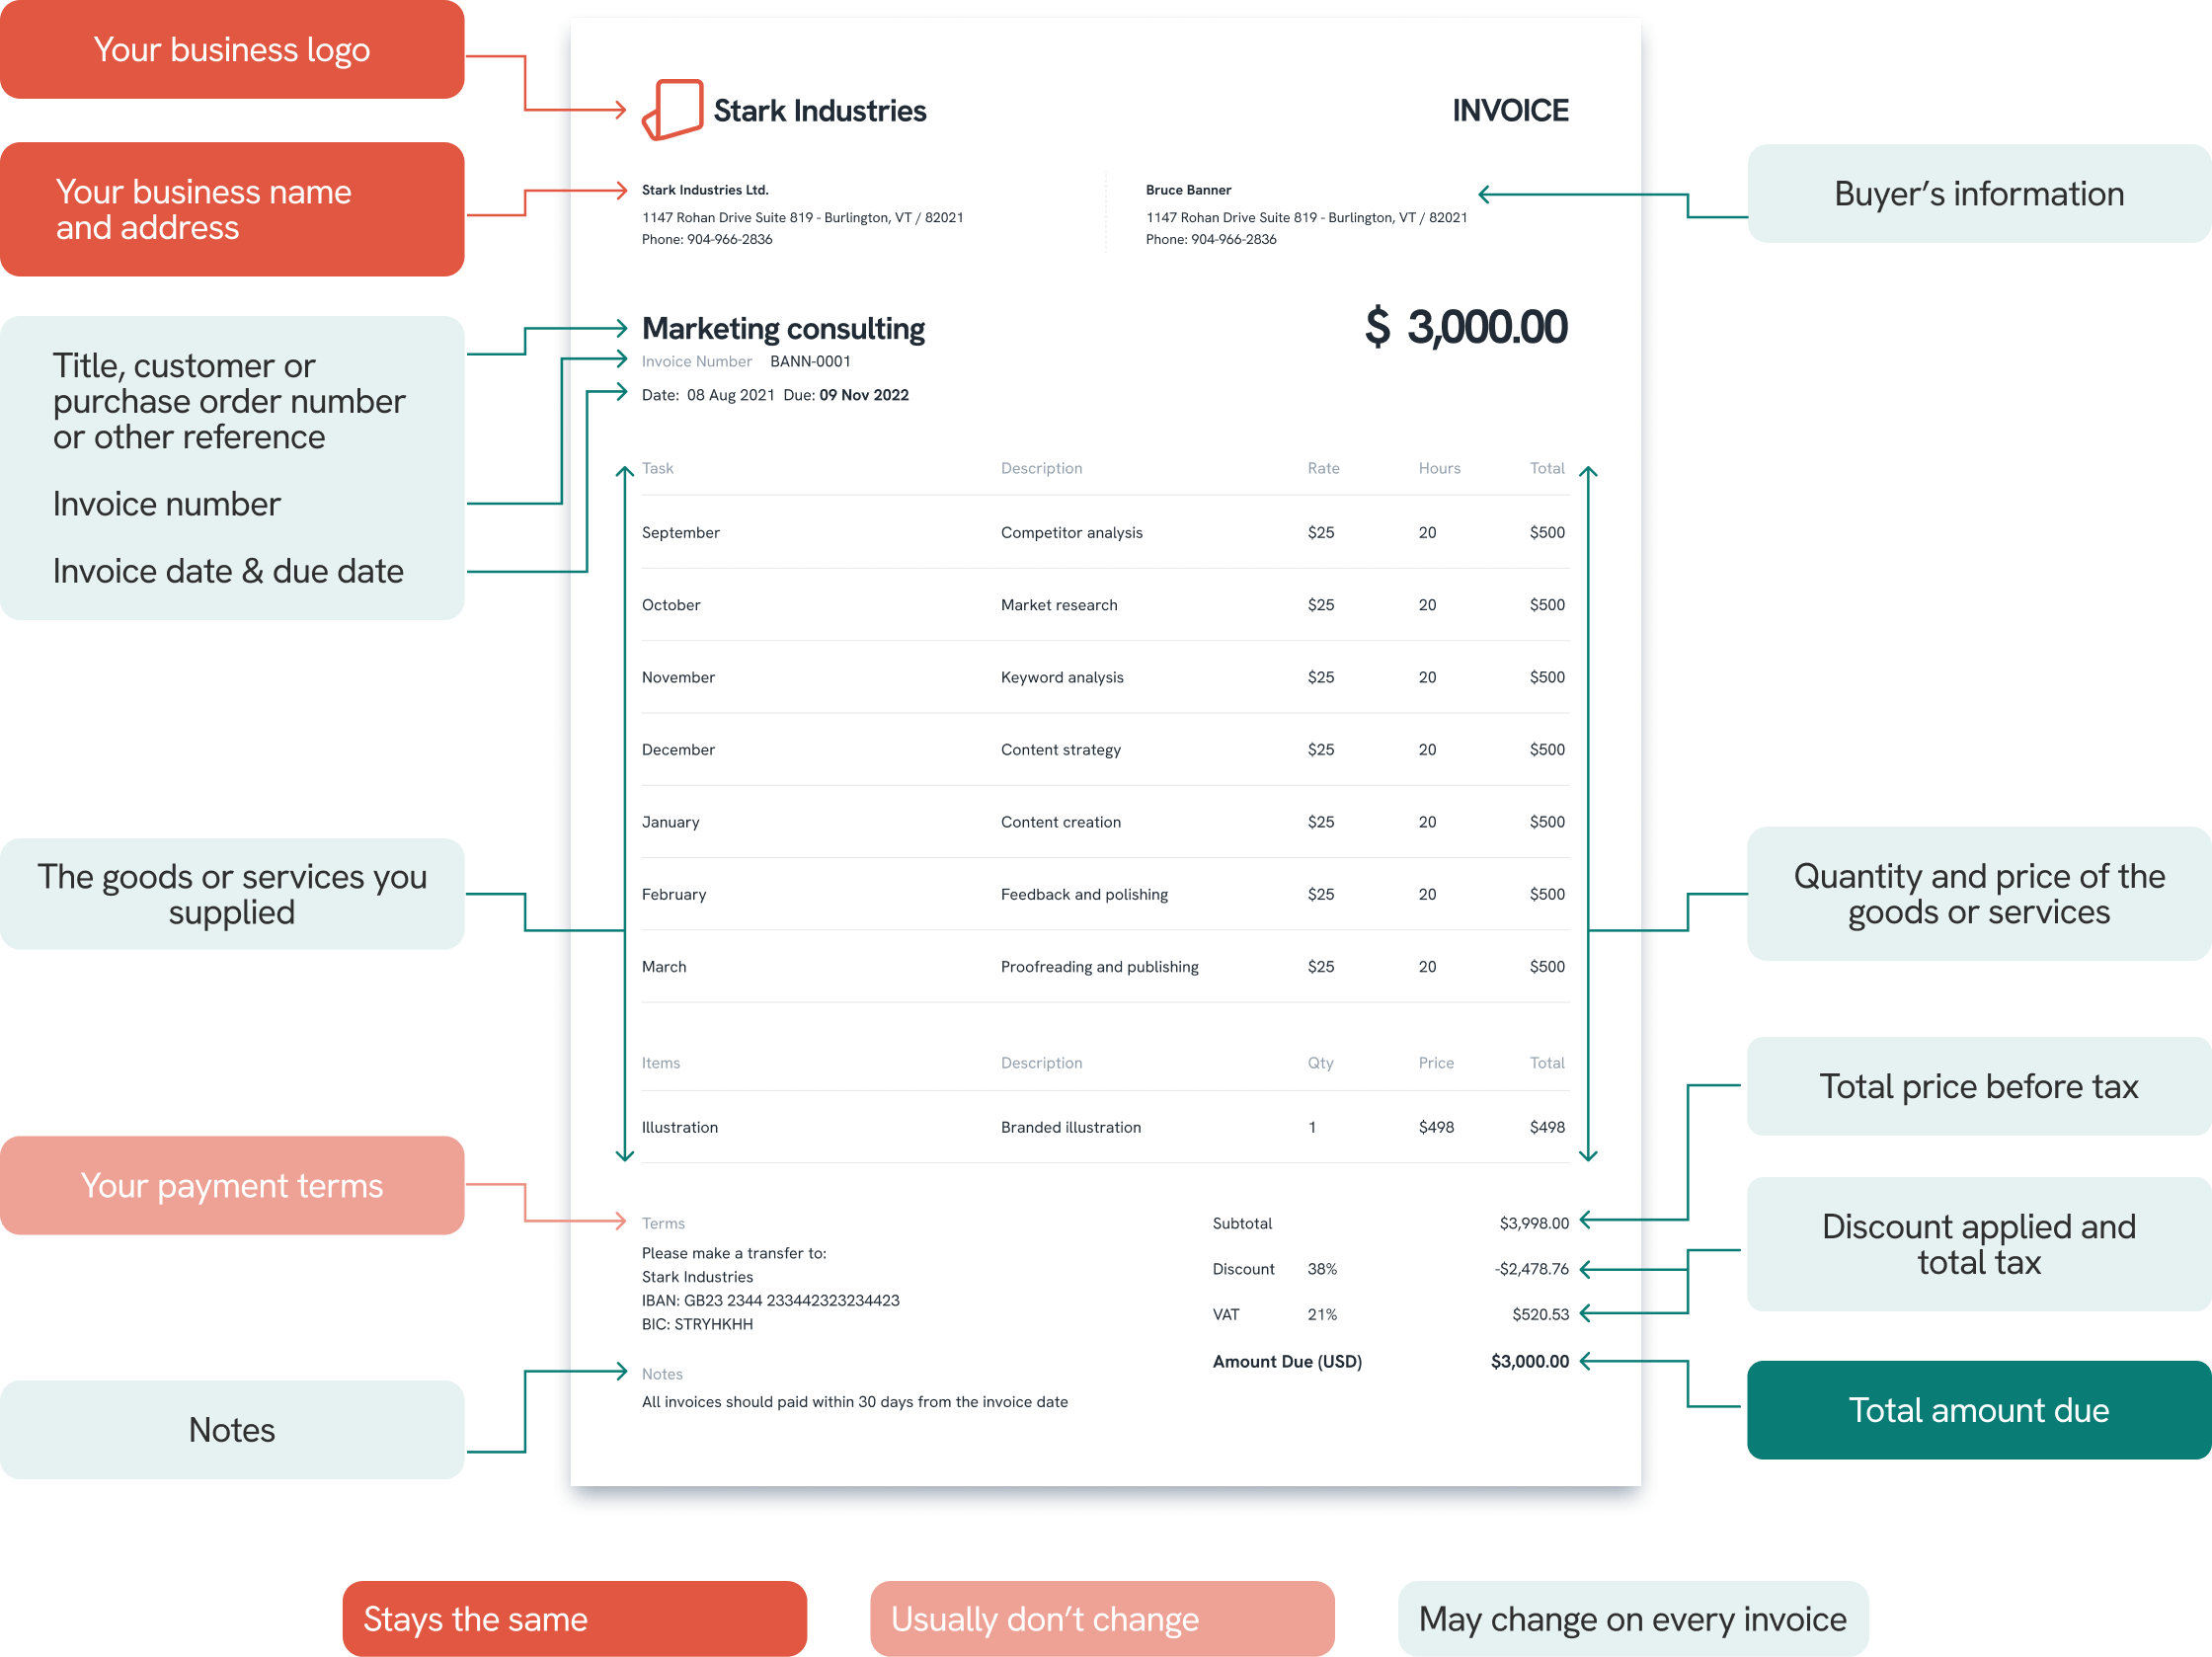
From the sample invoice, you can see that although it contains quite a number of important information, they are all straightforward and legible.
Here are the eight steps to create a professional invoice.
Step 1: Add an Invoice Header
The header is the top section on the first page of your invoice, typically above the itemized list of the products or services. It is where you should include the word “ Invoice” for legal and organizational purposes.
In this section, you should add:
- The term “Invoice”
- Your business name and logo
- Your business address and contact information
- Your customer’s details, including name or business name, address, and phone number
If you are the seller, you may also have to include your tax identification number depending on the local laws about collecting sales or service taxes. It can also facilitate tax filing processes.
For example:
- All businesses in Australia have to apply for a registered Australian Business Number (ABN) that must be listed on an invoice.
- Goods and Service Tax (GST) numbers are associated with every business in India.
- In the European Union, VAT identification numbers must be included if the local laws require it.
Step 2: Add an Invoice Number
An invoice number is a unique identification code assigned to every invoice to help identify transactions, track payments, avoid duplicates, and facilitates record-keeping and accounting process.
It is necessary to assign an invoice number for every invoice you create. Including an invoice number on every new invoice is essential for maintaining organized records, simplifying tax reporting, and ensuring compliance with tax regulations.
While there is no fixed format, invoice numbers are usually combinations of alphanumeric characters with both alphabets and numbers.
Let’s look at some examples of how it can be formed:
- Include company initial: You can include an abbreviation that represents the company; for example, STA0001 is an invoice issued by Statrys.
- Assign a unique client or project number: You can also assign a number to identify your client chronologically. For example, Statrys issues invoice number STA-51-001 to its 51st client.
- Incorporate the date of issue: You can include the date of issue in your invoice number, for example, ST2023-20-11-0001.
💡 Tip: Make sure your numbering system is consistent. Although there's no required format for invoice numbers, they should be sequential. For example, use a series like ST001, ST002, and ST003.
Step 3: Add an Invoice Date
The invoice date indicates when the invoice is issued. It typically appears under the invoice number or under the business contact information.
It is important to include the date of issue because, depending on your payment terms, it can serve as a reference for your due date.
For example, an invoice issued on 20th November with NET 30 terms indicates that the payment is due by 20th December, allowing the customer to determine the deadline easily.
💡 Tip: Avoid confusion that can cause payment delays by spelling out the date (e.g., 20th November 2023), especially in international transactions where some countries use different date formats (e.g., MM/DD/YY or YY/MM/DD).
Step 4: Add Service or Product Details and Pricing
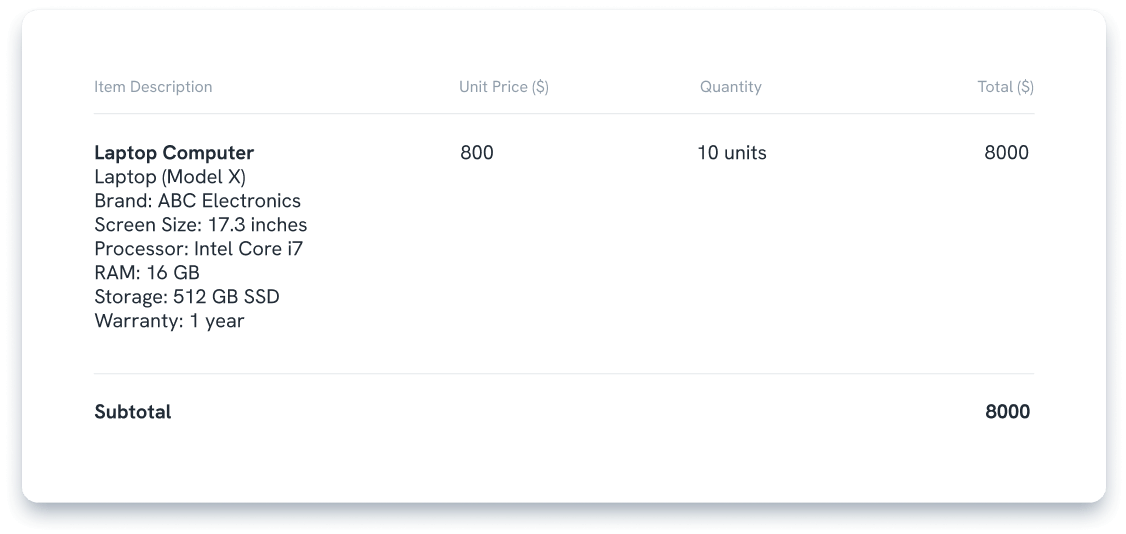
The next step is to list all goods or services rendered that are due for payments. Every item should be listed on a separate line, and the details should include the unit price, quantity, and total price of each item.
Typically, using a table with three to four columns is an effective method to itemize purchases. Providing a detailed price breakdown of the goods purchased can encourage faster payments from customers, as it enhances the transparency of the transaction.
For service invoices, you can also include an hourly rate and specific details about each service you’re charging for.
Simple mistakes of amount mismatches and incorrect descriptions can reflect poorly on your business, so ensure that you have updated your invoices before sending them out.
Here’s an example of goods and services details:
Step 5: Add Applicable Discounts or Taxes
Depending on your business type and client agreement, you might have to include discounts or taxes in your invoice.
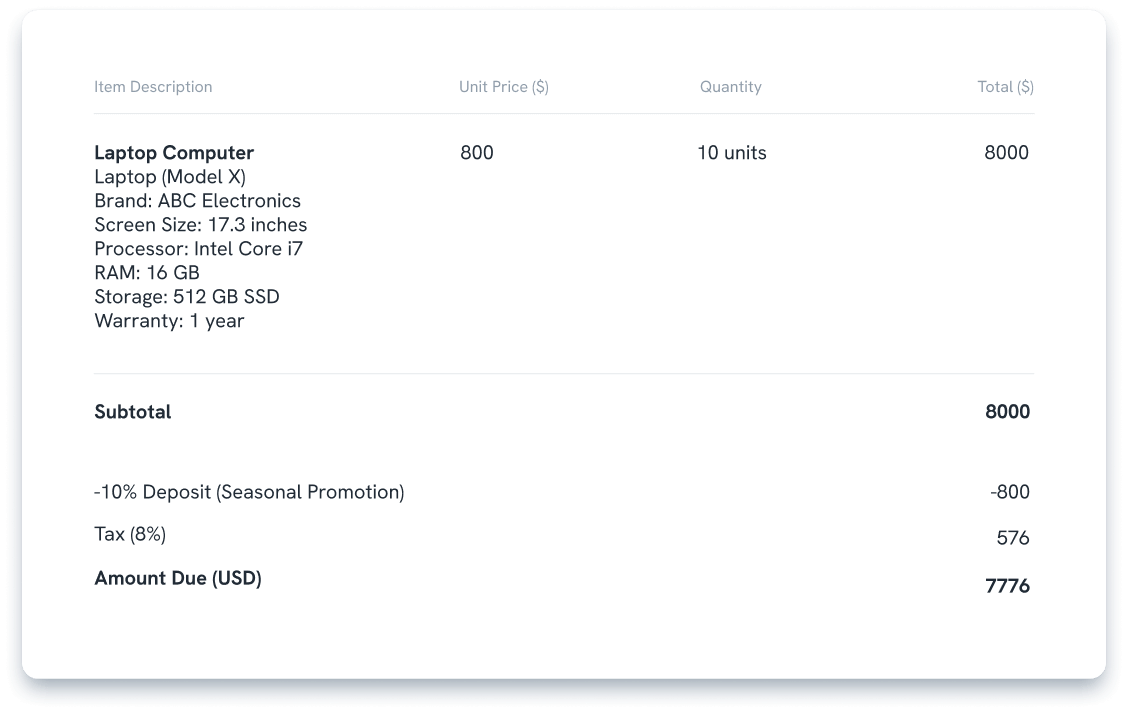
If there are any discounts, they should be applied before the applicable sales tax.
This means your final amount or grand total will be calculated with the following method:
Final Amount = (Subtotal - Discount) + Tax
An invoice should clearly show the discount and tax rates, along with the subtotal and final amount. You can also include a note explaining why the discount is applied, such as a new customer discount, holiday promotion, or year-end promotion.
This helps your client understand how the final amount is determined and prevents disputes.
Let’s look at an example:
Third-party reimbursements or certain state laws may result in discounts being applied after taxes. This can affect the final purchase price and tax calculations. The specific rules can vary by jurisdiction, so it's advisable to consult with a tax professional or local tax authority for guidance.
💡 Tip: Always include the currency with the price, such as Total Price ($) or Amount Due (USD).
Step 6: Add Payment Terms
These are the payment instructions on how and when the customers have to pay. They vary depending on the vendors, but they are essential rules and conditions that must be included on every invoice.
It is crucial for businesses to clearly state the payment terms and conditions, such as payment methods, due dates, and late payment penalties, to avoid misunderstandings and disruptions.
Here are the necessary details that need to be provided in the payment terms section.
Payment Method
For businesses, it is crucial to include the preferred payment method on the invoices to instruct the customer on how they can complete the transaction.
There are different ways to receive payments depending on the needs of different businesses. Still, the common methods include the following:
- Cash payment
- Pay by check
- Credit or debit card
- Bank transfer or wire transfer
- Online payment
- Automatic bill payment
💡 Tip: Providing multiple payment options can improve your chances of receiving timely payments. Online payment methods are also secure and convenient ways to manage payments.
Foreign Currency Exchange Terms
If you require to be paid in a specific currency or are doing cross-border transactions, then this must be specified in the payment terms.
Currency exchange rates are volatile and constantly changing, so if your payment requires a currency conversion, the amount can differ depending on the actual confirmed transaction date.
Payment Due Date
Setting an expected payment due date or period in an invoice alleviates the chance of delayed payment.
Typically, businesses request customers to pay the invoice within or by 14, 30, 60, or 90 days. These payment periods are usually written as Net, for instance, Net 15 or Net 30, and they would be specifically stated in the document.
Let’s look at some of the most common payment due date terms:
- Net 7, 10, 15, 30, 60, or 90 - This means that the customer must pay the invoice's net amount within a certain number of days from the date of issue.
- End of month (EOM) - The payment is due by the end of the month the invoice was issued. For example, whether an invoice was issued on 1 March or 15 March, the payment is due by 31 March.
- PIA (Payment in Advance) - The customer must pay the full amount of the invoice before the goods or services are delivered.
🔍 Fact: If the due date is not specified on the invoice, then it is most likely that you need to pay within 30 days, and businesses can claim overdue compensation after this period.
Discounts for Early Payments
To encourage early payments from customers, businesses can offer discounts if they pay their invoices before the due date.
Discounts for early payment are usually expressed as a percentage of the invoice amount and a number of days before the due date.
For example, “2%/10 NET 30” or “2/10 NET30” means the customer can get a 2% discount if they pay within the first 10 days of a 30-day payment period. After that, they will have to pay the full amount.
The most common early discounts are 2/10 net 30, 1/10 net 30, and 2/15 net 45.
These discounts are only provided when the business is certain they won't affect the profit margin or as a way to manage cash flow.
Penalties for Late Payments
To avoid late payments or having to chase outstanding invoices, you may consider setting penalties for late payments.
If you’re including a late payment penalty in the invoice, make sure to write the condition straightforwardly. For example,
A late payment fee of $25 will be applied to all balances outstanding more than 30 days past the due date.
Late payment penalties serve as an incentive for timely payments and can also offset costs associated with delays. However, to maintain positive and professional client relationships, you should consider doing the following when outlining the penalties:
- Ensure effective communication - Ensure customers are aware of and agree to late payment penalties in advance.
- Establish clear and consistent penalty policies - Clarify the penalty and their respective amount. It can be in the form of an administration fee for follow-ups for late payments or interest incurred after a certain timeframe for any delayed payment.
The penalty amount should be reasonable, with the primary goal being to encourage timely payments rather than generating additional profit. Typically, a small percentage or a modest fixed amount.
- Offer a grace period – A specified time after the due date, during which no penalties apply—to give customers extra time and foster positive customer relationships.
- Ensure compliance with legal regulations - Certain state laws may impose caps on late penalty fees or mandate that businesses offer a grace period, among other requirements.
When deciding whether to include late payment penalties in your payment policies, consider industry norms and assess the impact on customer relationships.
A general guideline is that you may consider charging penalties for frequent late payers while offering enough flexibility for occasional late payers.
Also, It's crucial to keep lines of communication open at all times.
Step 7: Add Payment Details
After outlining the payment terms, it is important to include the details of how customers can pay. These details, such as bank account numbers, are essential, especially for online payment methods.
There are two overarching payment method types: international and country-specific or domestic.
International Payments
There are various international payment methods you can choose from when making a cross-border transfer.
The details the customers are required to have to make payments mainly depend on where the payments are being made.
Here are the three common details that are usually provided along with the payment methods:
- For a telegraphic transfer (TT) or wire transfer, the SWIFT/BIC code is necessary for cross-border payments.
- For SEPA payments made within Europe, the IBAN account number is required.
- For PayPal transfers, a valid email address is required to make payment through the PayPal network.
Some countries are bound by strict local tax regulations for making and receiving international payments for commercial services or goods provided. Additional processing fees may also be charged when making cross-border payments. You may consider these factors when choosing a payment method for your offshore clients.
Domestic Payments
When issuing invoices for companies or individuals from your home country, you can provide local bank account details or payment methods unique to that country.
For instance, in Hong Kong, you can include your Hong Kong bank account number together with your name.
If you are making local invoice payments in Australia, the company account holder's name, BSB number, and account number are required.
Step 8: Style Your Invoice Templates
Now that you have included all the essential details in your invoice, you may consider customizing the invoice design to match your brand style.
Choosing colors and fonts that are easy to read and mirror the look of your website, social media profiles, and other online and offline presence can boost the strength of your brand identity.
Consistency across all business materials also enhances professionalism and fosters brand recognition, leading to increased loyalty and trust. Having a unique invoice template also facilitates invoicing management, making it easier to identify invoices.
Still, you should value the clarity of the information on your invoice equally as style. You can make it easier to scan by adding borders, lines, and grids and highlighting important details, such as the grand total and due date, on your invoice templates.
Tips for Effective Invoicing
Apart from understanding what to put on the invoices, knowing when and how to send an invoice is also crucial for your business to get paid for the goods or services provided.
Here are some best practices for making and sending an invoice:
- Choose the right format: Use email, paper mail, or online invoicing software based on what works best for your business and clients.
- Be clear and professional: Create a professional-looking and concise invoice with all necessary details, such as the date, invoice number, client information, and payment terms.
- Send out invoices promptly: Issue and send invoices to your clients as soon as possible, especially with a shorter period of payment. Sending out invoices on time increases the chance that you will get paid on time.
- Follow up on late payments: Send a friendly reminder email or make a phone call to ensure that clients are aware of payment terms if they haven't paid on time.
- Offer payment options: Offer multiple payment options, such as both credit card payments and PayPal, to make it easier and more convenient for clients to pay invoices on time.
- Issue proof of payments: Always issue a receipt for your client after the transaction is completed as proof of payments.
With these best practices, you can streamline your invoicing and financial management, as well as maintain professionalism in transactions with your customers.
💡 Tip: Avoid confusion by making sure that your client is expecting the invoice before sending it. Some customers may also refer to an invoice as a bill of payments, which is a different document. Always communicate with your clients to ensure smooth transactions.
Automating the Invoicing Process
66% of businesses spend at least five days to process invoices each month. If you are a business owner who frequently handles multiple orders and invoices, you might want to consider using a free invoice generator or invoicing software to increase efficiency.
Not only can you save time by automating your invoicing process, but you can also reduce the chance of errors that can cause payment delays.

Use Invoicing Software to Create Invoices
Statrys Invoicing Software is a free online platform designed for small to medium-sized businesses to effortlessly and efficiently create, send, track, and organize invoices.
The platform offers a range of features, including sharing invoice links through email or messaging apps, automated payment reminders, online payment options like PayPal, OCR technology for capturing invoice details from scanned materials, and real-time financial performance monitoring.
FAQs
What to include on an invoice?
A completed invoice should include: 1. Details related to your business (name, address, contact number) 2. Details related to your customer (name, address, contact number) 3. Date of issue 4. Invoice number 5. An itemized list of goods or services provided, including unit price, hours, and quantity 6. Discounts and applicable taxes 7. Total price 8. Payment terms, including due date
Can I create an invoice myself?
Yes, you may write your own invoice if you have the relevant information, such as the recipient's name, the item or service being charged, the date, and the amount.
How do you make invoicing easy?
You can use an online invoice generator or invoicing software to make the invoicing process easier and more efficient.
How can I create an invoice for my small business?
To make an invoice for your small business, collect the relevant information, such as the recipient's name and contact information, the item or service being charged, the date, and the amount. Provide your company's name and address, as well as your tax identification number and payment conditions. You can use invoicing software or templates to make the process easier and more professional.
Do I need a business to create an invoice?
No, you don't need business to create an invoice. You can issue invoices for the labor you do or the commodities you sell, whether you provide services or sell products as an individual. However, it is vital that your invoice conforms to local regulations and has all relevant information.


